Stihl FS50 Ignition Coil Common Issues and Solutions?
The Stihl FS50 ignition coil is a crucial component in ensuring your trimmer runs smoothly. Many users encounter issues that disrupt performance. Common problems can include inconsistent starting, reduced power, or engine stalling. Understanding these challenges is essential.
Frequent issues arise from wear and tear or poor maintenance. Ignition coils can deteriorate over time. Signs of failure often go unnoticed until significant performance drops occur. Users may experience frustrating situations, especially when using the trimmer for yard work.
Finding solutions to ignite your Stihl FS50 ignition coil can enhance your experience. Addressing these problems promptly can prevent costly repairs later. This guide will explore common issues and offer practical solutions to keep your trimmer in top shape.
Common Symptoms of Ignition Coil Issues in Stihl FS50
When dealing with ignition coil issues in the FS50, you might notice several symptoms. One prominent sign is difficulty starting the engine. You turn the key, but it just won’t start. This could stem from a faulty ignition coil. It’s frustrating, especially when you have work to complete.
Another symptom often reported is uneven engine performance. The engine may sputter or stall unexpectedly. You might feel power loss while using the equipment. This irregular function can disrupt your workflow. Additionally, you may notice increased fuel consumption. When the ignition coil fails, the engine does not perform efficiently, leading to wasted fuel.
People often overlook these signs. They might think they are minor issues, but they signal a larger problem. Regular maintenance can help prevent these issues. Checking the ignition coil periodically can save time and effort. Neglecting these symptoms might lead to a complete breakdown later, requiring more extensive repairs. Addressing them early can lead to smoother operation and peace of mind.
Stihl FS50 Ignition Coil Issues and Solutions
This bar chart illustrates the common symptoms associated with ignition coil issues in the Stihl FS50, showcasing the frequency of each symptom reported by users. Notably, increased fuel consumption was reported most frequently, indicating a possible indicator of ignition coil failure.
Step-by-Step Diagnosis of Ignition Coil Problems
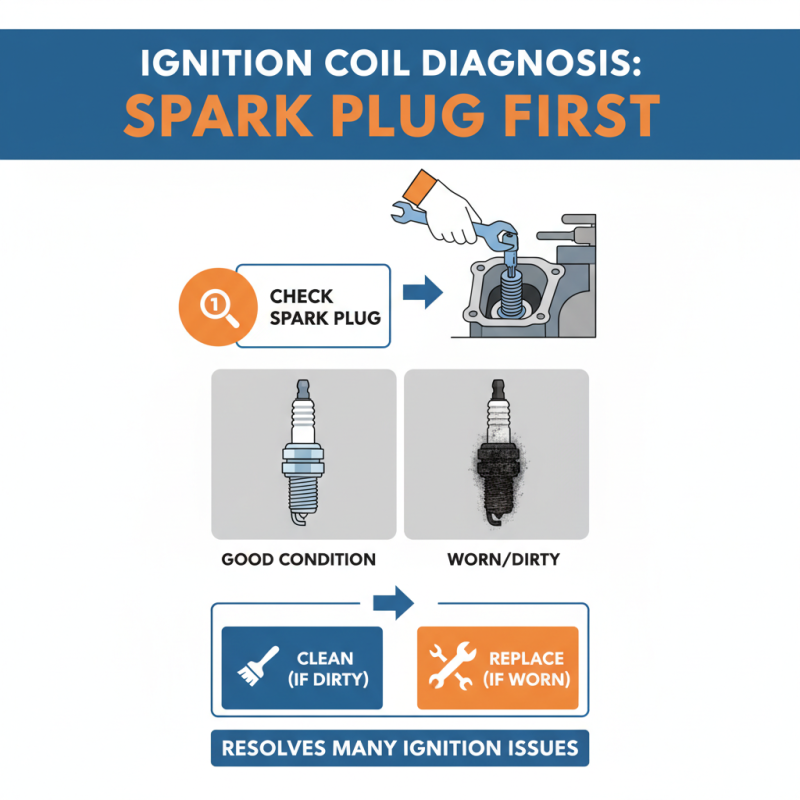
Diagnosis of ignition coil issues can be tricky. Start by checking the spark plug. A worn-out or dirty spark plug can lead to ignition problems. Remove it and inspect for wear or excessive carbon buildup. Clean or replace if necessary.
Next, examine the ignition coil itself. Look for signs of damage or corrosion. Ensure all connections are secure and free from rust. Sometimes, a simple tightening can solve the problem. A failing ignition coil can cause erratic engine behavior, like sputtering or stalling.
If the engine still fails to ignite, consider testing the coil's resistance. Use a multimeter to check readings against specified values. Low or high resistance often means a faulty coil. Finding the right tools for this task is essential. Sometimes, effort can yield unexpected results. Persistence in diagnosing the problem is key.
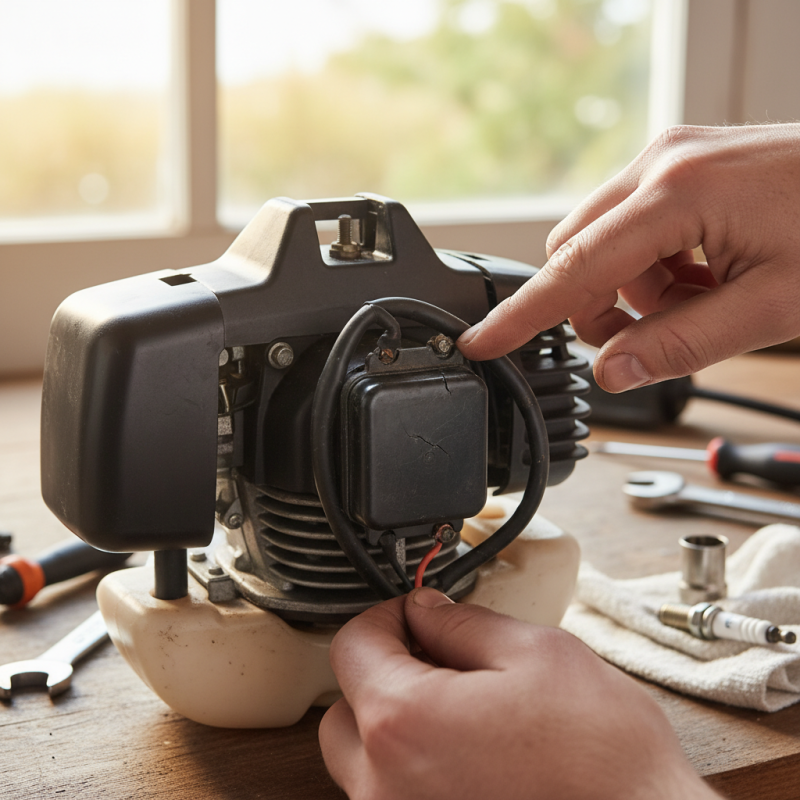
Replacement Process for Stihl FS50 Ignition Coil
Replacing the ignition coil on a trimmer can seem intimidating. However, with a bit of guidance, anyone can tackle the process. Begin by gathering necessary tools. You will need a screwdriver, a wrench, and safety gloves. Always ensure the trimmer is turned off and unplugged before starting. This step is crucial for safety.
Start by removing the cover. This may require unscrewing several bolts. Take your time here; rushing could lead to stripped screws. Once the cover is off, you will see the ignition coil. Disconnect the wires gently. Make sure to note the connection points, as this will help during reassembly.
After removing the old coil, it’s time for the new one. Align it properly to avoid any misfitting. Connect the wires as per your earlier notes. The challenge lies in ensuring a secure fit. Some users may find it hard to tighten the screws adequately. Finally, test the trimmer before reassembling everything. If it doesn’t start, revisit the wiring connections. Noticing small details can make a significant difference.
Preventative Maintenance Tips for the Ignition Coil
The ignition coil is crucial for small engines. It converts battery voltage to higher voltages. This process is termed voltage transformation. According to industry reports, nearly 30% of engine performance issues relate to the ignition coil.
To ensure the longevity of the ignition coil, regular maintenance is vital. Check connections for corrosion or wear. Replace cracked wires. Effective cleaning can remove debris that may cause misfires. Inspecting the ignition timing can reveal hidden issues. Over time, components wear down. Neglecting them can lead to poor performance or failures.
Monitoring the engine’s running conditions is also key. Keep an eye on overheating. Engines running too hot can stress the ignition coil. Additionally, operating conditions matter. Frequent short trips can prevent proper heating, reducing coil life. Look for signs of wear, such as rough idling or stalling. These signs are often overlooked but critical for performance. Regular checks save time and money in the long run.
Troubleshooting Other Related Electrical Issues in Stihl FS50
When dealing with ignition coil issues, other electrical problems in the equipment might arise. A common symptom can be an inconsistent spark. If the machine starts sometimes and not others, this could signal a larger electrical malfunction. Check connections and battery status. A loose wire can disrupt signal flow and affect performance.
Another frequent issue is the presence of damaged components. Look for frayed wires or corroded terminals. These can lead to malfunctioning systems. If you notice any signs of wear, immediate replacement is advisable. Additionally, ensure the grounding is secure. Poor grounding can lead to unexpected shutdowns.
Testing components with a multimeter can yield valuable insights. This often uncovers hidden problems that might go unnoticed. You may find readings that are outside acceptable limits. If anomalies surface, further investigation is essential. Repairing or replacing faulty components promptly can save time in the long run. Consider each element of the electrical system, as neglecting one can cause cascading failures.